LocateAnything-3B
· 阅读需 7 分钟

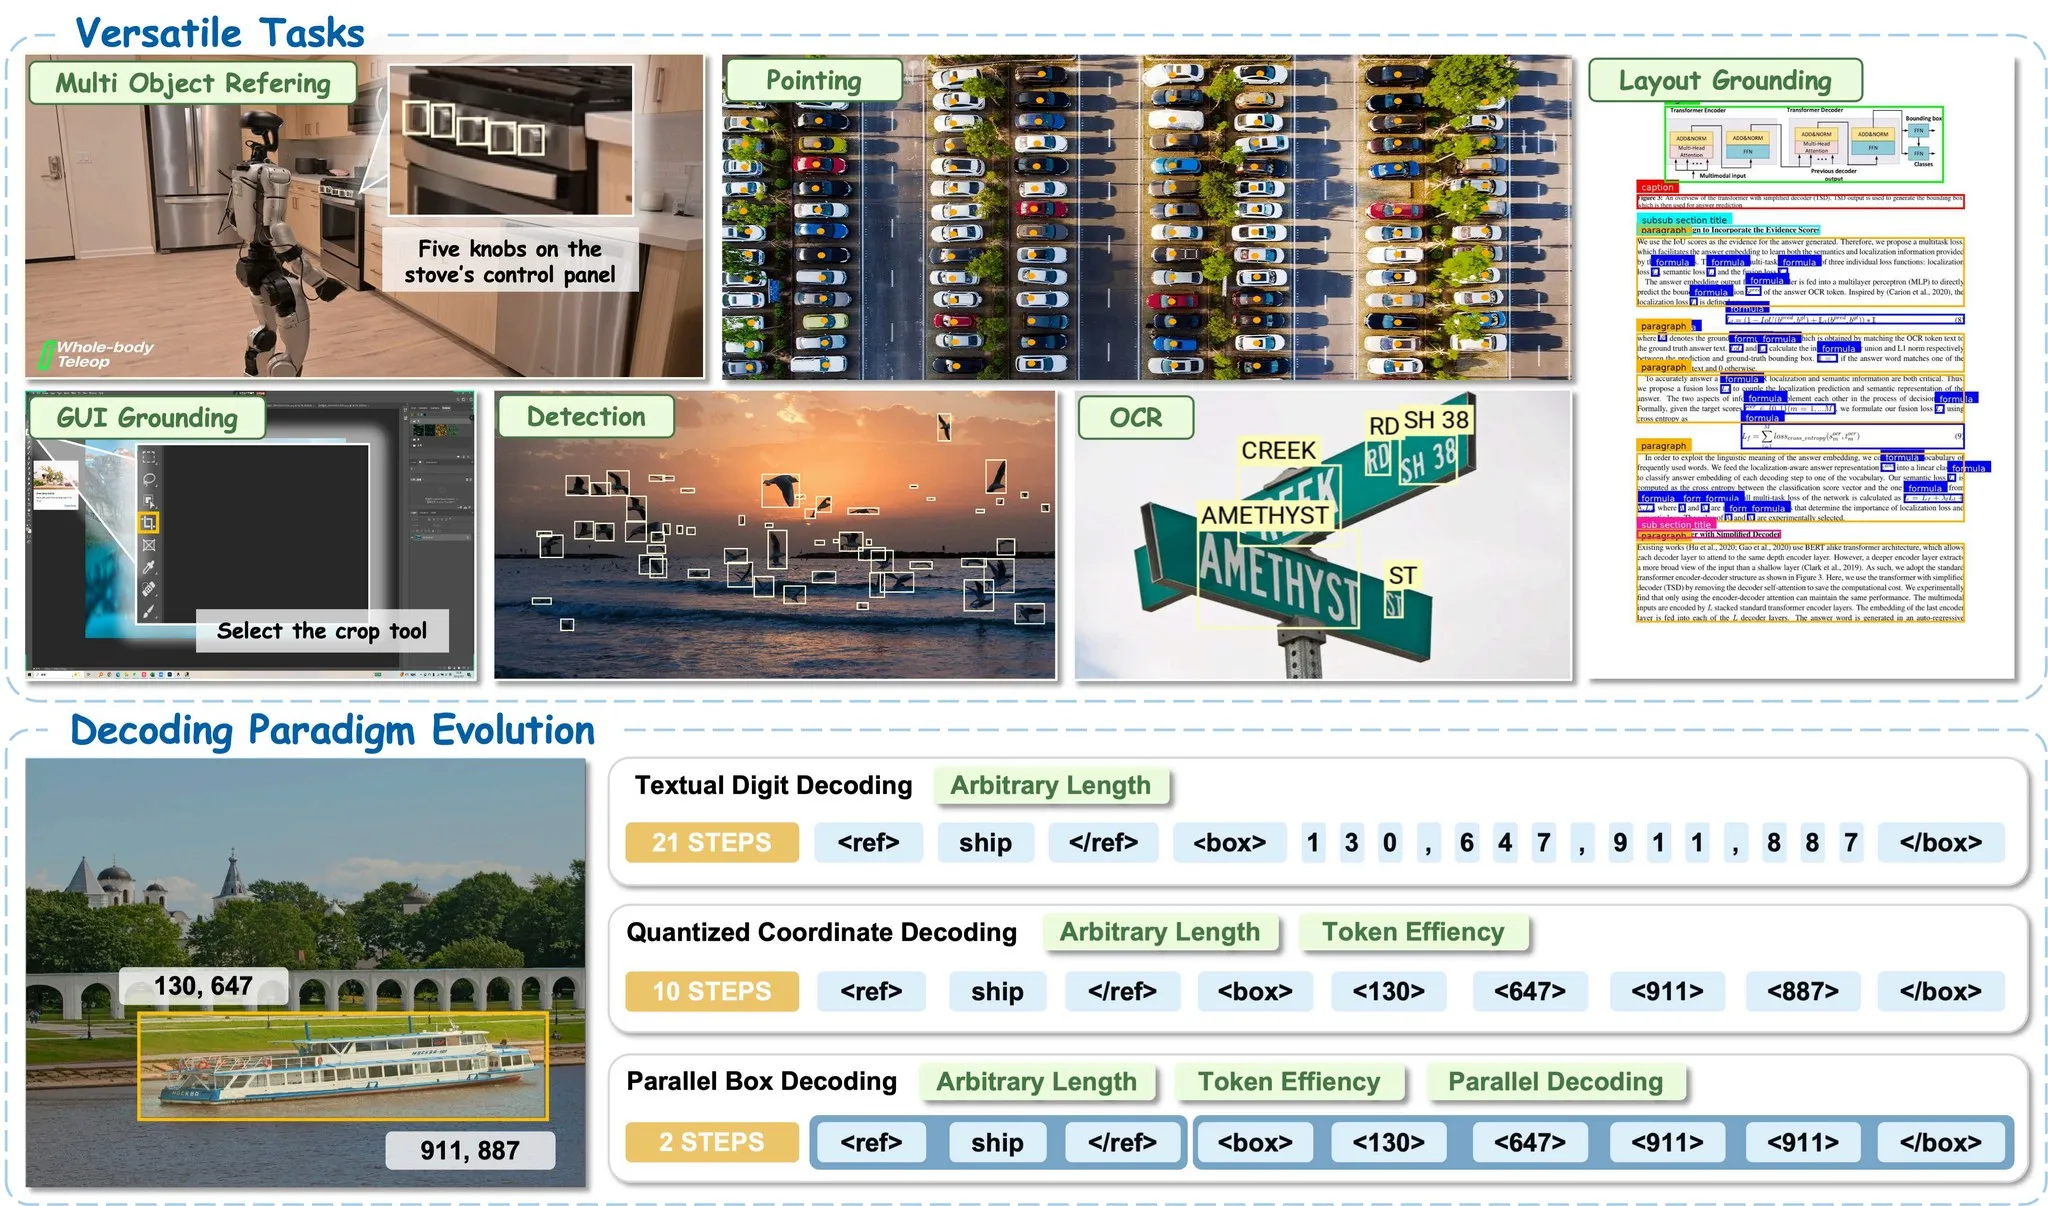
LocateAnything 是一种视觉-语言模型,用于实现快速且高质量的视觉定位,能够在企业智能(Enterprise Intelligence)和物理人工智能(Physical AI)等多个领域中进行精确的目标定位、密集检测和基于点的定位。该模型采用通用设计,支持指代表达定位、多目标检测、GUI 元素定位和文本定位等任务,并在复杂和杂乱场景中表现出色。其核心创新——并行边界框解码(Parallel Box Decoding, PBD)——通过单次并行步骤预测完整的边界框坐标,而非采用自回归方式逐个生成标记(token),从而在保持几何一致性的同时提升了效率。与先前方法相比,吞吐量最高可提升 2.5 倍。
该模型在一个大规模多领域数据集上训练而成(包含 1200 万张图像、1.38 亿+ 查询和 7.85 亿个边界框),涵盖自然场景、机器人、自动驾驶、GUI 交互和文档理解等领域。它作为通用多模态感知的基础模型,已被集成到 NVIDIA 最新一代的生产级视觉-语言模型中,例如 Nemotron 3 Nano Omni,用于支持定位、GUI 理解和多模态智能体能力。
1. 模型概览
| 特性 | 描述 |
|---|---|
| 模型架构 | 基于 Transformer 的视觉-语言模型 (VLM) |
| 参数量 | 30 亿 (3B) |
| 视觉编码器 | MoonViT |
| 语言模型 | Qwen2.5-3B-Instruct |
| 核心优势 | 并行解码,吞吐量比传统方法提升最高 2.5 倍 |
| 支持分辨率 | 生产环境最高支持 2.5K 分辨率 |
2. 环境配置与安装
在开始之前,请确保你的环境中已安装 PyTorch(需匹配你的 CUDA 版本)。
基础依赖安装:
pip install opencv-python-headless==4.11.0.86 transformers==4.57.1 numpy==1.25.0 Pillow==11.1.0 peft torchvision decord==0.6.0 lmdb==1.7.5
可选加速(推荐 Hopper/Blackwell GPU 用户):
为了获得更快的推理速度,可以安装 MagiAttention:
git clone https://github.com/SandAI-org/MagiAttention.git
cd MagiAttention
git checkout v1.0.5
git submodule update --init --recursive
pip install -r requirements.txt
pip install --no-build-isolation .

3. 快速开始:Python 代码示例
以下是一个封装好的 LocateAnythingWorker 类,用于加载模型并执行推理。
import re
import torch
from PIL import Image
from modelscope import AutoModel, AutoTokenizer, AutoProcessor

class LocateAnythingWorker:
    """Stateful worker that loads the model once and serves perception queries."""
    def __init__(self, model_path: str, device: str = "cuda", dtype=torch.bfloat16):
        self.device = device
        self.dtype = dtype

        # 加载分词器和处理器
        self.tokenizer = AutoTokenizer.from_pretrained(model_path, trust_remote_code=True)
        self.processor = AutoProcessor.from_pretrained(model_path, trust_remote_code=True)

        # 加载模型
        self.model = AutoModel.from_pretrained(
            model_path,
            torch_dtype=dtype,
            trust_remote_code=True,
        ).to(device).eval()

    @torch.no_grad()
    def predict(
        self,
        image: Image.Image,
        question: str,
        generation_mode: str = "hybrid",   # "fast", "slow", "hybrid"
        max_new_tokens: int = 2048,
        temperature: float = 0.7,
        verbose: bool = True,
    ) -> dict:
        messages = [
            {"role": "user", "content": [
                {"type": "image", "image": image},
                {"type": "text", "text": question},
            ]}
        ]

        # 处理对话模板和视觉信息
        text = self.processor.py_apply_chat_template(messages, tokenize=False, add_generation_prompt=True)
        images, videos = self.processor.process_vision_info(messages)
        inputs = self.processor(text=[text], images=images, videos=videos, return_tensors="pt").to(self.device)

        pixel_values = inputs["pixel_values"].to(self.dtype)
        input_ids = inputs["input_ids"]
        image_grid_hws = inputs.get("image_grid_hws", None)

        # 生成结果
        response = self.model.generate(
            pixel_values=pixel_values,
            input_ids=input_ids,
            attention_mask=inputs["attention_mask"],
            image_grid_hws=image_grid_hws,
            tokenizer=self.tokenizer,
            max_new_tokens=max_new_tokens,
            use_cache=True,
            generation_mode=generation_mode,
            temperature=temperature,
            do_sample=True,
            top_p=0.9,
            repetition_penalty=1.1,
            verbose=verbose,
        )

        result = {"answer": response[0] if isinstance(response, tuple) else response}
        if isinstance(response, tuple) and len(response) >= 3:
            result["history"] = response[1]
            result["stats"] = response[2]
        return result

    # --- 任务便捷方法 ---
    def detect(self, image: Image.Image, categories: list[str], **kwargs) -> dict:
        """目标检测 / 文档布局分析"""
        cats = "</c>".join(categories)
        prompt = f"Locate all the instances that matches the following description: {cats}."
        return self.predict(image, prompt, **kwargs)

    def ground_single(self, image: Image.Image, phrase: str, **kwargs) -> dict:
        """短语定位 - 单个实例"""
        prompt = f"Locate a single instance that matches the following description: {phrase}."
        return self.predict(image, prompt, **kwargs)

    def ground_multi(self, image: Image.Image, phrase: str, **kwargs) -> dict:
        """短语定位 - 多个实例"""
        prompt = f"Locate all the instances that match the following description: {phrase}."
        return self.predict(image, prompt, **kwargs)

    def ground_text(self, image: Image.Image, phrase: str, **kwargs) -> dict:
        """文本定位"""
        prompt = f"Please locate the text referred as {phrase}."
        return self.predict(image, prompt, **kwargs)

    def detect_text(self, image: Image.Image, **kwargs) -> dict:
        """场景文本检测"""
        prompt = "Detect all the text in box format."
        return self.predict(image, prompt, **kwargs)

    def ground_gui(self, image: Image.Image, phrase: str, output_type: str = "box", **kwargs) -> dict:
        """GUI 定位 (框或点)"""
        if output_type == "point":
            prompt = f"Point to: {phrase}."
        else:
            prompt = f"Locate the region that matches the following description: {phrase}."
        return self.predict(image, prompt, **kwargs)

    def point(self, image: Image.Image, phrase: str, **kwargs) -> dict:
        """指向任务"""
        prompt = f"Point to: {phrase}."
        return self.predict(image, prompt, **kwargs)

    # --- 结果解析工具 ---
    @staticmethod
    def parse_boxes(answer: str, image_width: int, image_height: int) -> list[dict]:
        """解析模型输出为像素坐标的边界框"""
        boxes = []
        for m in re.finditer(r"<box><(\d+)><(\d+)><(\d+)><(\d+)></box>", answer):
            x1, y1, x2, y2 = [int(g) for g in m.groups()]
            boxes.append({
                "x1": x1 / 1000 * image_width,
                "y1": y1 / 1000 * image_height,
                "x2": x2 / 1000 * image_width,
                "y2": y2 / 1000 * image_height,
            })
        return boxes

    @staticmethod
    def parse_points(answer: str, image_width: int, image_height: int) -> list[dict]:
        """解析模型输出为像素坐标的点"""
        points = []
        for m in re.finditer(r"<box><(\d+)><(\d+)></box>", answer):
            x, y = int(m.group(1)), int(m.group(2))
            points.append({
                "x": x / 1000 * image_width,
                "y": y / 1000 * image_height,
            })
        return points
4. 任务支持矩阵
下表列出了模型支持的具体任务及其对应的调用方法和提示词模板:
| 任务类型 | 调用方法 | 提示词模板 (Prompt Template) |
|---|---|---|
| 目标检测 | worker.detect(img, ["cat", "dog"]) | Locate all the instances that matches the following description: [CATEGORIES]. |
| 短语定位 (单) | worker.ground_single(img, "red car") | Locate a single instance that matches the following description: [PHRASE]. |
| 短语定位 (多) | worker.ground_multi(img, "people") | Locate all the instances that match the following description: [PHRASE]. |
| 文本定位 | worker.ground_text(img, "title") | Please locate the text referred as [PHRASE]. |
| 场景文本检测 | worker.detect_text(img) | Detect all the text in box format. |
| GUI 定位 (框) | worker.ground_gui(img, "btn", "box") | Locate the region that matches the following description: [PHRASE]. |
| GUI 定位 (点) | worker.ground_gui(img, "btn", "point") | Point to: [PHRASE]. |
| 指向任务 | worker.point(img, "traffic light") | Point to: [PHRASE]. |
5. 推理模式说明
模型支持三种生成模式,你可以通过 generation_mode 参数进行切换:
fast(最快): 仅使用 MTP(多 token 预测),不回退到自回归。适用于简单场景,速度最快。slow(最稳): 纯自回归解码。速度最慢,但鲁棒性最高。hybrid(默认/推荐): 混合模式。先尝试 MTP,在遇到不确定的边界框时回退到自回归,并在结束后切回 MTP。在速度和准确性之间取得了最佳平衡。
6. 使用示例
# 初始化工作器
worker = LocateAnythingWorker("nv-community/LocateAnything-3B")

# 加载图片
img = Image.open("example.jpg").convert("RGB")

# 1. 目标检测
result = worker.detect(img, ["person", "car", "bicycle"])
print("Detection Result:", result["answer"])

# 2. 短语定位 (多个)
result = worker.ground_multi(img, "people wearing red shirts")
print("Grounding Result:", result["answer"])

# 3. 场景文本检测
result = worker.detect_text(img)
print("Text Detection:", result["answer"])

# 4. 指向任务
result = worker.point(img, "the traffic light")
print("Pointing Result:", result["answer"])

# 5. GUI 定位 (点)
result = worker.ground_gui(img, "the search button", output_type="point")
print("GUI Point:", result["answer"])

# 6. 解析输出为像素坐标
w, h = img.size
boxes = LocateAnythingWorker.parse_boxes(result["answer"], w, h)
points = LocateAnythingWorker.parse_points(result["answer"], w, h)
7. 许可与限制
- 许可协议: NVIDIA License。
- 使用范围: 仅限学术和非营利性研究目的。
- 商业限制: 禁止商业用途,除非获得 NVIDIA 及其关联公司的明确授权。
- 免责声明: 模型按“原样”提供,不提供任何形式的担保。
